
Greenleaf Annabelle Dollhouse Project
Looking at the house, the siding is about an inch and a quarter lower than where the porch roof will attach to the house. Let's keep this section open and add something in this space later on.
Measuring all around the house, we leave a nice gap before starting the 4th row of siding. This row is a little harder to get right, since there's no row below it to interlock with. We'll be very careful and work our way around the whole house, and then add another row on top of that.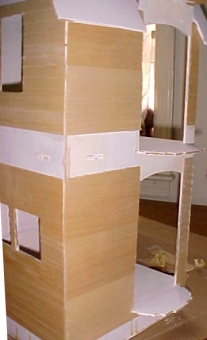
This brings us just to the base of the roof peaks, and seems like a good place to stop the siding. We've also got some ideas for the gables, so we're finished with the siding completely, except for a little bit of front door detail, but we'll get to that later on.
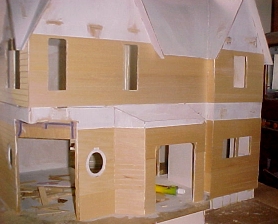
That means we can now seal the siding with Gesso. Apply a nice even coat of gesso and let it dry, then apply another coat over it and let the whole thing dry overnight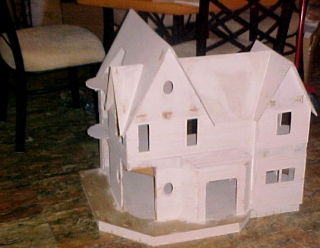
Now the real work begins. Using a sanding block or disposable nail files, sand all the siding to a nice smooth finish, one board at a time. You're probably better off doing one small section at a time and then taking a break to rest your sore arm. Ouch!
Color
Oh yeah, now it's starting to come together. All this work has been in preparation for the finish work. Obviously we still have a long way to go, but the time has come to add some color. We decided a long time ago that this was going to be a colorful "Painted Lady". For months, we've been thinking about color schemes, looking at the details of real buildings and houses to see what is actually done, and we even went so far as to buy two fairly expensive books about Painted Ladies. Turns out it was the best thing we ever did, because there are hundreds of pictures of different houses, showing not only a myriad of color choices, but it's given us literally hundreds of ideas and hints on how to build this house!
| Here's a hint on the basic color scheme we're going to use |
We figured to get around this by airbrushing the paint onto the house. We picked up a portable airbrush kit that comes with a can of propellant. That gives a good enough pressure for watercolors and other very thin fluids. Paint? Uh-uh. Clogged it right up, not enough pressure to push the paint out. Tried watering down the paint, looked awful, gave up on that idea. Maybe we'll get this figured out for another house down the road, it seems like an idea worth pursuing.
We quickly give our siding 2 coats of cotton candy pink paint (Baby Pink), applied with a brush. By working with long strokes, we managed to make a somewhat even finish, but by the time it dried, it was all shiny with many ridges visible.
Another round of sanding smooths it all out and leaves a nice pink background for our next coat.
We apply the last coat with a foam brush, and it leaves a nice smooth finish with only a minimum of shine.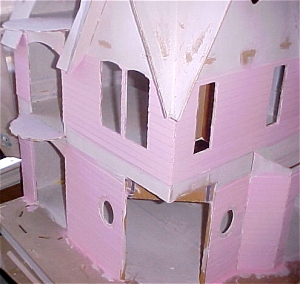
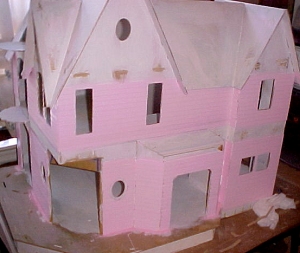
What happened to the front entrance?!?!?!
In the meantime, you might have noticed by now that we've made some changes to the front entranceway. We want something really grand for the entrance, and the doors that come with the kit are nice, but let's take it a little further. We began searching for a door for Annabelle, but the entrance isn't exactly standard size, which gave us a bit of a problem. Some of the nicest doors we saw just won't fit without a lot of modification, which we're just not capable of doing.
Ahh, here's a nice one...
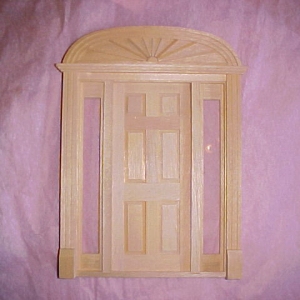
This will require some changes to the front, but it's only wood, and we have a saw sooo......
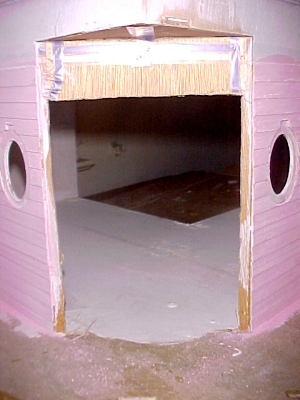
Well, looks like we hacked this away pretty rough, but it doesn't matter very much, it's going to be covered. Let's see how the door will look in the (ahem) modified entranceway.
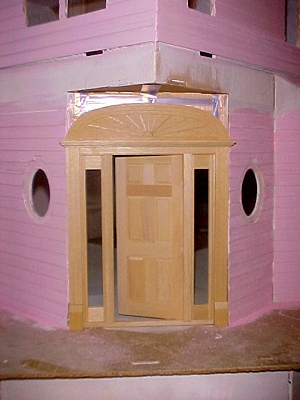
We've still got to work out the detail above the doorway, we might need to add a bit of siding to match the adjacent walls, but we'll worry about that later (gee, we sure seem to say that a lot, hope this all works out later)
What's Next
We've now completed four weekends of work on the house. This represents several more hours of work spaced over several short sessions during the weekend. Things should get even more interesting next week when we try to get fancy. See ya then!
Greenleaf Annabelle Dollhouse Kit $169.95
Cir-Kit Deluxe Wiring Kit $109.95
Real Wood Siding 24" x 3" with 1/2" board spacing $2.95 ea
Hobbyist Tool Kit $49.95
Brass Hammer $11.95
Gesso, 32oz bottle $11.95
metal file set $12.95
Assembled Curved Stairway $39.95
You can get these supplies listed below in any hardware store:
2" width paint brush
sandpaper
masking tape
Carpenter's Wood Glue